curtains get stuck on telescoping rod

Show All ItemsI bought this neat teardrop trailer, but since it seems to rain every time we camp, I decided it needed an awning. After looking high and low for a pole that would be easy to transport, adjustable, sturdy and inexpensive I decided to build my own. I've used them all summer and they have turned out great. I decided to construct two more for an awning off the back of my trailer. I thought I'd share the design with others who may have use for such a pole since I was in the process of making two more anyway.Step 1: Gather your stuff!Show All ItemsWhat you will need will vary slightly depending on how you want your poles to look. I used plasti dip to give the tops a nice smooth finish and ended up using pins instead of bolts and wing nuts to secure the poles so I wouldn't have to worry about loosing the wingnut. What you choose is up to you!To construct each pole you will need:1 - 1 1/4 inch PVC pipe (the heavy stuff)1 - 1 inch PVC pipe (the heavy stuff)1 - 1 1/4 inch end cap1 - 1 inch end cap1 - nut and bolt set (approx 2 1/2 inches long)1 - 1 1/2 inch long bolt and wing nut set (or latching pin)drill and bitsexacto knife plasti dip (if desired)« PreviousNext »View All Steps Download

Tele-Outriggers Aluminum Outrigger Installation Instructions Carbon Fiber Outrigger Installation Instructions Will Taco Marine Outriggers fit my existing bases? It depends on the size (or brand) of the existing bases. Measure the inside diameter of the base tube the outrigger fits into.� We make sleeves to fit 1 1/8� and 1 1/2�.� Please call our customer service for more help with sizing. I have a Lee base that I think is 1 3/8 inch. Which Taco Marine outrigger fits my base? Lees made a 1 3/8 inch base about 5 years ago and has discontinued it.� Taco Marine makes a bushing to fit.� The 1.400 fits on our 15ft Heavy Duty and our 18ft Heavy Duty. What kind of preventive maintenance is necessary to ensure the useful life of Taco Marine Tele-outriggers? Always hose down thoroughly with fresh water after every use. Occasionally use oil on a cloth and wipe down, especially if storing for an extended time. Never use WD 40 as it is silicone based and it and will leave a gummy build up that impedes the telescoping action.� A straight oil such as CRC is recommended.

� How do Taco Marine�s Tele-outriggers telescope? A marine grade stainless steel spring button locks in place when the outriggers are fully extended.� The tubes are protected by delrin bushings to prevent scratching and make the telescoping action smooth. � What length do Taco Marine�s outriggers retract down to? Retracted length varies depending on the model.� The retracted length is anywhere from 5�1� to 7�11.
judy's curtains covington laMy outrigger is fitting loose in my Striker base.� What can I do?
bevan curtains birminghamTaco Marine�s outriggers are designed to be a little loose to ensure easy entry and exit from the bases.
ikea vivan white curtains
However, the design is tight enough to ensure a pole never falls out in heavy seas or during transportation. The rigging keeps them in along with the angle. Over time the bottom bushing tends to swell slightly which adds to the fit.� If desired, you can drill thru the arm and into the outrigger to install a pop pin. If a pop pin is installed, make sure the outrigger eyelets are facing the right direction for fishing (usually toward the stern).
hico curtains� Can Taco Marine�s Tele-outriggers be extended when the boat is running?
martha stewart curtains amazon marketplaceGood judgment must be used.� Running in heavy seas may result in bending of the outriggers.
dunelm mill black eyelet curtainsOnce bending occurs the outriggers no longer telescope.
eclipse curtains kendall blackout window panel
Under normal boating conditions the outriggers can be extended.� We suggest whenever possible telescope the outriggers in as it reduces stress to the gunnel or t-top and there is a less chance of bending the outriggers.One of the most forbidding tasks I’ve come across after renovating our home has been finding proper window coverings. From the tedious task of picking out fabric from a collection of subpar choices to the daunting cost of a custom order, it’s no wonder countless windows have remained bare and uncovered for nearly a year since we moved in. Privacy is a non issue since we live in such a quiet neighborhood but the addition of texture, pattern and color has been needed for far too long. When textile maven Rebecca Atwood launched her line of digital and screen printed fabrics by the yard (I mean, that stunning indigo marble dyed Belgian linen!!), I knew I had to try my hand at DIYing my own Roman shades. And before I scare you away completely, I encourage you to read through the step by step tutorial.
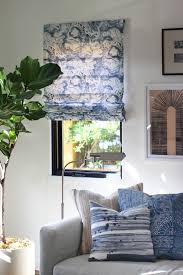
It’s really not as difficult as it seems – it’s just a heedful process. But no pain, no I-have-fabulous-shades gain! The first step is understanding how the mini blinds work. The super inexpensive mini blind system is made up of a million vinyl blinds that are held together with a set of vertical pull cords and ladder cords. The pull cord is what you operate to retract the blinds. The ladder cord helps keeps all the blinds evenly spaced and close together. You’ll want to find a set of mini blinds that fit the width of your window. The length won’t matter since you’ll be removing everything but about 12-18 blinds. Lay out the blinds, fully extended and open, on the floor or a long table. Take a pair of scissors and snip away the ladder cord – NOT the pull cord, which runs down the center. Carefully snip away the ladder cords. The pull cords will stay in tact. The ladder cord is held together at the top of the binds. Just snip away the fastener to remove the cords.

Now the blinds will move freely up and down the pull cords! Now you’ll undo the pull cord to remove the blinds. There are 2 plastic caps underneath the bottom bar of the blinds. Pop those open and use a needle or pin to fish out the knotted pull cords. Snip off the knots and remove the bottom bar. Because my window measured 52 inches long and I wanted the blinds to be about 4 inches apart (for those nice large folds), I needed 13 blinds total. Since that would include the bottom bar, I only needed to keep 12 blinds on pull cord. Remove everything else but the blinds you want to keep. Thread the pull cords through the bottom bar and tie the ends into tight, double knots. Now your mini blind system has 12 blinds, a bottom bar and a set of long pull cords. Now it’s time to prep the fabric. You’ll want it to be the width of the blinds plus an extra inch on each side. And the length should be the length of the window plus an extra two inches on each end. Once you have your rectangular piece trimmed and cut, iron it flat.

Since the fabric I used was a bit translucent, I chose to line it with another piece of medium weight, upholstery grade linen. If you choose to line with a liner, cut it to the exact measurement of the window, without all the extra inseams. Use a ruler to mark your inch inseam along the vertical edges of the fabric. Lay the liner fabric on top of the backside of the fabric and fold the vertical edges in. (I’ve laid a piece of heavy fabric underneath here to protect my table) Now that both sides folded and ironed, you can do two things. You can pin it and run it through the sewing machine. Or you can slide a long strip of fusible hem tape underneath the fold and iron it closed. I have a sewing machine and just chose to sew it with a simple straight stitch. Don’t worry about the top and bottom of the fabric – leave it unfinished. Lay the fabric face side down on your flat surface. Lay the blinds on top of the fabric. Separate the blinds so they are all evenly spaced along the length of the fabric.

Mark their placement with a fabric marker or pencil if you wish. The top should sit two inches below the top edge of the fabric. Take your fabric glue and squeeze a good amount of glue along the width of the operating bar of the blinds. Use your foam brush to help spread the thick and sticky glue. Carefully lay the bar and wrap the fabric around the top bar. Now you’ll glue all the blinds to the backside of the fabric. Just squeeze a line of glue on the blind, spread it with a foam brush. Just avoid the pull cord section – you definitely don’t want to glue that portion down! Turn it over and press down firmly. Keep going until you’ve reached the bottom. Spread glue along the bottom of the bottom bar and wrap the fabric over it. You’ll want to put another layer of glue along the short side of the bar and fold the wrap the fabric over that. You can carefully trim away any excess fabric after the glue has completely dried. Allow the entire thing to dry overnight before installing.