converting rod pocket curtains to pinch pleat

So as I said in my recent post sharing my Spring Refresh, I decided to change up a few things in the living room recently – by removing all the turquoise in the room, adding some plants and changing up my vignettes. That was a good start but the turquoise curtains and the stainless steel curtain rod were still sort of throwing things off and so I decided that I wanted to replace and update them. Of course, while I would love to have a huge budget to allow me gorgeous custom curtains on, oh I don’t know, a brass and lucite rod, well, that wasn’t going to happen because I don’t have that sort of cashola. So off to Ikea I trotted and when I spotted the SANELA curtains in the same velvety lush fabric I had previously, I knew they’d be perfect. What wasn’t perfect about them, however, was the grommets (or eyelets as they are also referred to). Now I had grommets on my previous curtains but I wanted something a little different and I knew they’d clash with my plans for the curtain rod.

I know, I know. But to be fair, I honestly didn’t have a clue what I was doing to start and changed my mind about 5 times through the process and I didn’t even think it would work. But hmmm… it turns out it did. So I’m going to try to explain because to be honest, it was really easy.
pokemon black and white episode curtain up unova league I could have done a simple rod pocket here but I wanted something a little more sophisticated so I decided on a loose and casual pleated hem.
curtains l'ultime cauchemar I first measured from the rod to the floor to see what the finished size needed to be. I added another 10cm to that measurement. Using that measurement as the total height required for the fabric, I cut the excess from the top of the curtains where the grommets were (leaving the bottom hem in tact).
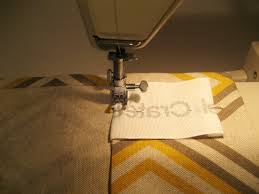
Then I folded the top over 2cm, ironed it and folded it again another 8cm so the cut part was hidden underneath and the final size was the finished measurement. Then, using super-simple-to-use web tape, I ironed the fold closed. This created a nice sort of placket at the top of my curtain. I then sewed 3 inch curtain tape to the placket I’d just created, pulled the strings so that the gathers were created, tied the strings at each side, added my hooks and attached them to the curtain rings.Told you it was easy! I’m so happy with the new curtains and the colour it brings into the space. We don’t really use them across the whole bay, they are really just to add some softness to the window but I probably would have needed a few more curtain panels if that’s what I wanted to do (simply sewing them together for more width). But the colour combination of the olive green of the sofa and the deep berry pink of the curtains really highlights the touches of cerise pink in here and it all just makes me incredibly happy.

But there’s more news… On Friday, I showed you a bunch of wallpaper that I’m loving lately and I told you one of them was going in my house somewhere… well, that somewhere is in here!! Yep, I’m replacing the Cole & Son’s Cow Parsley which has served me well for nearly 5 years – but ya know, it’s time for a change and a chance to create a slightly different look in here. So, I’m still not going to say which one it will be (even though I got my sample in and fell in love with it) because I’m mean like that and I enjoy torturing you ;) – and also, I like the element of surprise! However, I do intend to get this done in the next couple of weeks so I’ll be showing you that very soon, I promise! Here are the choices again (maybe it’ll be easier to guess? I also have an announcement on Wednesday that’s kind of a big deal so be sure to stop back then!! I have been having to keep quiet about it for SO LONG but I can finally give you a little hint about what’s going on around here…

In the meantime, what do you think of the new curtains? Is this a DIY you would try? < Previous | Next > Making Your Own Curtains: Easy Instructions from Across the Web (Image credit: Amanda Carol at Home) As any fan of interior design knows, curtains are one of the easiest ways to give a room a face-lift. They have the power to instantly brighten or soften a room, and I love using them to inject drama and pattern into a space. But pre-made panels can often be cost prohibitive or an improper fit for oddly sized windows, and that's when DIYing comes in. Here are some online tutorials that will get you sewing (or no-sewing, as the case may be) in no time. And to further customize your curtains, think of combining several of the techniques discussed below; for example, use the no-sew technique with striped drapery or the bed-sheet method with the rod-and-pocket construction. Rod and Pocket Curtains: • Adventures in Dressmaking No-Sew, with Curtain Clips: