spacing of grommets on curtains
Nothing sounds more nerve racking than spending so much time sewing curtains only to cut huge holes in them for Grommets!! But I love the look of Grommets and I think they are easier to open and close especially if you have a bulkier fabric and they lay a bit better on the rods. After spending hours and hours sewing curtains for my son's room that I lined with black out fabric, I was then tasked with cutting holes in my beautiful curtains for the grommets! Adding grommets to your curtains are very easy. Besides grommets you really only need a scissors, pencil, ruler and a calculator. I personally think one of the hardest parts to adding grommets to curtains is figuring out the math! (And I love math!!!) first step is to measure the width of your curtain and determine how many grommets you want to use. My packet came with 8 grommets, but since my curtains were only 50.25 inches wide I decided to make my life easier and only use 6 of them. Time for some grommet math!!!!

1. Measure the width of your curtain and determine the number of grommets you will be using. Determine how far from the edge you want your first and last grommet toI ended up putting mine 2.5 inches from the end (from the center) This number is up to you and you can sort of play around with it and the next steps to make your middle spacing work out for you! don't want to go any closer than 2 inches (from the center of the grommet) to about half of your spacing for your below spacing, so theyIn my case my spacing was a little over 9 inches, so I would not want my grommets to be more than 4.5 inches from the edge so 3. Next subtract the end amount from your total curtain width. (5 in my case) Now take this number and divide it by the number of grommets you are(Because you want the inches between each grommet) 5. This is how far apart your grommets should be. A helpful way to figure out even spacing number for your grommets is to divide your total curtain length by your grommets minus 1.

In my case I get 10.05. This gives you an idea on how far apart they will need to be so you can play around with your numbers to get something that works out well and makes measuring easy! Once you have the math figured out, it's best to layout your grommets and make sure the math will REALLY work!! Once you have the math figured out, it's time to measure! Packages of grommets should come with directions and a circle template. In my case I had to cut out the circle and mark the center myself on my template. My grommets I bought over a year ago on clearance and have since used a newer package and it came with a better template!! Marking the center makes it easier to line up your template! The you simply line up the center of the template to your measurement and draw your circle on the fabric. Next is the difficult part.... cutting your beautiful fabric.... it's so difficult to make that first cut!!!! It's better to make the hole small and if you need to you can always remove more.... you can't add back more fabric.....
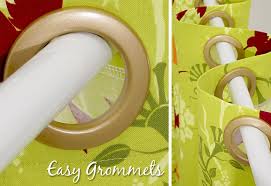
The hole..... it won't look pretty at this point, especially since my curtains had about 6 layers at the top with the liner!! Place the grommet in according to the directions of the package, but they should just snap together... And you are done!!!!
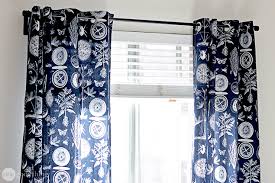
gold birds jacquard pencil pleat curtains Repeat several more times and then its off to hang your lovely new curtains!!!
arsenal curtains argosAgain, here are the finished hanging curtains!
curtains and drapes dunelm Front Page Tips & Resources Sewing Tips & Tricks How To Use Snap-on Grommets
ls430 curtains
How To Use Snap-on Grommets Sewing Tips & Tricks I promised a tutorial for our Basement Drapes, so here it is! And it's loaded with pictures - I hope it's not too bad to get through. How to make THIS... 60" wide Home Dec. or canvas Fabric - 5.5 yards - (purchased mine at IKEA at $7.99/yd.)
cost plus suzani curtains Seam Gauge (to measure folded edges)
curtains hillington 12" Ruler (to measure grommet spacing)
kay gould curtains made for free Measuring Tape (at least 10-ft long to measure length of drape) 2 packages of Grommets ($12.99 sets of 8, bought at Joann's with a coupon) Curtain Rod (small enough to fit through grommet holes) Marking pencil or pen Always be consciencious of the direction of your fabric print and/or texture.

I'd be sad if one drape print ran in an upward direction and the drape next to it went in a downward direction! It's easiest to make a pair of drapes at a time, rather than making one side of the drape first followed by the other side of the drape. I used 100% cotton fabric, so I used my iron at the hottest setting. If you use polyester, silk, or blended fabrics, please be careful with your iron setting so you don't burn or melt the fabric! Since these drapes were going to lie up against a basement wall, I didn't line them. However, if you're going to make drapes to go over a real window, please buy drapery liner fabric at the fabric store and tuck it into the back of these drapes to so they're not so see-through when closed. Plus it's classier to see white drape liner from the outside of your house than the back of some wacky printed fabric. Might as well hang a Big Bird sheet with clothespins up in front of yer' dang winderr' then! Length Measurement for Cutting Fabric:

1) measure your ceiling height down to the floor to get the length of your drape. 2) add 6.5" for your top and bottom folds (86" + 6.5" = 92.5" for my total length of each drape) 3) Cut two long lengths of fabric at 92.5" each (or just cut your 5.5 yards of fabric in half if you want your drapes to puddle a bit at the bottom onto your floor) Order of Sewing (to get you mentally organized): By doing the top and bottoms first, the sides will fold over their seams, leaving a long, clean, smooth edge from the side view of your drapes. READY - SET - SEW!!! a) fold in 1/2" of the TOP edge of the fabric, pin in place, and press with a hot, steamy iron. (side note: I went to Catholic schools and had to iron pleats all around my skirts - took forever, but I learned how to pin one fold after another and another, then press them all at once by sticking pins into the ironing board) b) fold in another 4" of the TOP edge of your fabric, pin in place, and press with the iron.

(this area is where your grommets will go) c) Sew with a straight stitch very close to the inner edge (1/8" to 1/4" max) a) fold in 1/2" of the BOTTOM edge of the fabric, pin in place, and press with a hot, steamy iron. b) fold in another 1.5" of the BOTTOM edge of your fabric, pin in place, and press with the iron. - here's where you're going to get a little fancy with what I call a "Military Sheet Fold... kinda," to get a clean, mitered looking corner at the tops and bottoms of the drapes (my Dad was in the Navy) - a) Place a pin 1.75" up from the TOP edge b) Open the raw edge between the top fold and the pin, and push the center of the fold up into itself toward the pin, creating a 45-degree angle that goes out to about 1.5" from the top edge. Weird sounding, I know... here are pictures to help: c) do the same thing to the BOTTOM EDGE place a pin 1.75" from the raw edge (to the right of my finger), then push fold up into itself bottom edge after miter corner fold, half inch fold, and 1.5" fold - ready to sew

NOW you can proceed with the same fold - pin - iron steps as the bottom: d) fold in 1/2" of the SIDE edge of the fabric, pin in place, and press with a hot, steamy iron. e) fold in another 1.5" of the SIDE edge of your fabric, pin in place, and press with the iron. f) You can straight stitch the sides, but it might leave your drape looking a little, what I call, "woogilly-waggilly". There's no give with a reeeeally long straight stitch. So I think it's better to do a "Blind Hem Stitch" (hey! I used a real sewing term for once!). Your sewing machine may not have this stitch, but if it does, your sewing manual should show you how to do it. (if not, it's worthy of its own tutorial) Here are some pictures: how you fold the fabric back to stitch onto the inside of the 1/2" fold, picking up a few threads of the outer fabric every 5th stitch how the stitch looks like on the backside of your fabric how the stitch looks like on the outside of your fabric (follow package directions, really... which is:)

a) evenly space grommets, starting at 2" from either edge of the top of the drape. I kinda eyeballed the spacing first and then measured to get more accurate, even spacing. My grommets ended up being 5" apart, edge to edge (or approx. 7" from the center of each grommet) b) use the template and a pen/pencil to mark a grommet circle - being careful to center it between the top edge and bottom edge of the 4" area that was stitched down at the beginning c) cut out the circles using the skills you learned in kindergarten. d) wedge the grommet side with the inner lip through the circle, line up the top grommet piece over the bottom grommet piece, and, as they say in the south, "mash 'em" together - wah-lah! A grommet is born! e) continue with the remaining 7 grommets for a total of 8 across the top LASTLY, install your curtain rod, put the drape "over, under" style onto the curtain rod so the top is wavy looking, and hang for visual enjoyment! I used these drapes to cover up two long stretches of plain basement wall on either side of our small, high basement window.