spacing for drapery grommets

Today I wanted to share a one day makeover I finished for my friend Cheryl over the weekend. You remember when I painted her piano last year? We were hanging out in the backyard by the pool and discussing the sitting space – they have a fabulous pool and a nice pergola but her outdoor seating area was not as pretty as she liked and didn’t have any real sun protection. We conspired how to change all that on a budget, work with what she had, and finish in a day. I shopped for a few things and added some DIY outdoor curtains made of canvas panels and grommets. You can see the “before” below with their wood pergola and sectional, and the “after” once I added the curtains and accessories. She already had a great outdoor sectional they bought earlier this year with Sunbrella cushions (from Costco) the set just needed some color. I stopped by Lowes and Target and another local shop for a few supplies and pulled it all together for her in an afternoon. She wanted to include the blue tones from the backyard pool so that became the dominant accent color.

The bins and pillows are from Target (the floral pillow is from Lowes) and the rug used to be mine, but ever since I resurfaced our upper patio last year I wasn’t using it anymore so I gave it to my friend (originally from Crate + Barrel, seen here). Their yard gets really bright sun in the afternoon which is great for the pool but not so much for lounging, and Cheryl was saying how just one corner of protection would help.
the curtain lady and son lowestoftSo we decided to add panels to that one corner to block the sun and more panels all around so it looked balanced and also enveloped the space.
levolor curtain rod finials accessories I used inexpensive painters tarps from Lowes in natural canvas to create sailcloth style outdoor window curtains that don’t break the bank!
curtains sawston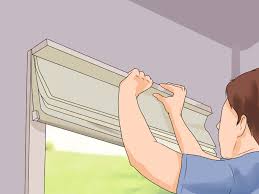
At only $14 each, they’re a great deal for so much fabric. They can be painted too if you want to get creative and add thick stripes or a stenciled pattern. Making them was so simple with canvas tarps and two grommet kits. To replicate, you’ll need a grommet kit, hooks to hang the panels (or a rod), canvas tarps, a hammer, scissors, and a big ol’ wood block to pound the grommets into place.
curtains ti rakau driveI followed the instructions on the kit, but instead of the little tool they give you to make a hole, I used scissors to make a quick snip.
circo pirate shower curtainEach panel takes about 15 minutes or so.
curtains and blinds tiptree The 6 x 9’ panels were the perfect width and length to hang from small hooks and the grommets keep them in place.
curtains neshaminy
There are 7 grommets that are a foot apart but the hooks are only 7 inches apart so the panels gather to look more like an indoor window treatment. You can see where Cheryl’s husband also added bamboo fencing to the top of the pergola to filter sun – such a great idea! We hung the panels from the top of the one beam and the bottom of the other so they look even – I adjusted the placement of the grommets on the canvas panels by an inch so they’d be balanced. I think I earned a few hours by that pool. Now their family has a great “room” where they can lounge and entertain for the summer season! Amazing what just a few accessories and creativity can do in a single day!Remember how I went to the Fashion District in LA looking for modern home dec fabric and didn’t find anything? Well I found it now. Michael Miller’s new BEKKO Collection by Trenna Travis is EXACTLY what I was looking for. Perfect colors, perfect prints, perfect weight. It’s 100% cotton sateen and it’s fabulous.

It comes out this month and I can’t wait. I got my hands on some sample fabric to play with and since we’re building a house and I want to do curtains for most of the window treatments the timing could not be better. I’m getting a head start so all my curtains can be finished and hung before our heads hit the pillows on the first night in our new house. First up: Linus’s room. Here’s a quick run down on how to make fully lined grommet curtain panel for 1 window: home dec weight fabric Roc-Lon budget blackout fabric ($6.99 full price at JoAnn – it’s the best and so cheap!) 2 packages grommets (8 in a package) finished length of the curtains 4. At the top of the curtain fabric, fold over 4.25″ and press. (I used a coordinating print for the top of the curtains – it takes a little bit of extra planning and math, but the most important thing is you want 4″ finished length at the top for the grommets.) 5. Open the curtain fabric back up and lay the black out fabric right along the press line.

Fold the curtain fabric back down, turn the edge under 1/4″, and stitch the top hem in place. (The grommets will hold the blackout fabric in place above the hemline.) 6. Lay out flat and fold up the hem – fold the serged edge under 1/4″ and then fold up again 2″. Stitch hem in place. 7. Sew the side seams the same way – fold the serged edge under 1/4″ and then over again 1/2″. Stitch at 3/8″ on both sides. 8. Mark the two end grommets so the center of the grommet is 2 – 3″ from the edge of the fabric. Measure the distance between the center points of the two end grommets and divide by 7. Trace the template that many inches apart, cut out using a small rotary blade or scissors, and snap the grommets together. Grommets are so easy to use and they look really professional and beautiful, but be sure to use all 8! I learned the hard way that if you only use 7 one end of the curtain rod will come out in front of the fabric and the other end will come out behind.