longest ikea curtain rod
This instructable will show you how to make strong, attractive and low cost curtain rods out of metal conduit. My goal was to make curtain rods similar to the Pottery Barn Standard Drape Rod but at a much lower cost. My biggest window needed a 106 inch bar which would have set me back $50 from Pottery Barn. Making my own rod using widely available EMT conduit ended up costing me less than $6. Your biggest variance of cost will be determined by your method of making or purchasing the finials.Step 1: MaterialsShow All ItemsThe materials for this project are pretty simple and inexpensive:Here is my cost breakdown:Tools:« PreviousNext »View All Steps DownloadPrices and availability are subject to change from the time and date that you print this page. For Customer Service, please call Matte Nickel 1.25"dia.x120"–170" Curtain Rod Set Contemporary matte nickel provides sleek, simple support. Matte Nickel 1.25"dia.x120"–170" Curtain Rod Set. Steel tube with matte nickel finishAluminum finials and brackets with matte nickel finishSet includes one 1.25"dia. telescoping rod, two finials, three brackets and mounting hardwareMade in China

Largest Measurement From WallWe love our big living room windows, but we wanted to be able to block the sometimes-blinding setting sun. However, we also wanted to hang the curtains wide enough to maximize our view. Just one problem: our windows are 118″wide, and the longest readily available curtain rods we could find only went to 120″. Lucky for me, I have an observant (and handy) husband. He’d seen metal conduit used as curtain rods, so we decided to investigate that section of the hardware store. Turned out that 10’lengths of 3/4″metal conduit could be had for just $3.99 each. With the help of a hacksaw, a few conduit hangers, and less than an hour of work, we now have a 152.5″curtain rod. It’s a bit industrial, but that’s perfect for us. –Mary T. Read on for photos and instructions! Enough conduit to combine for your desired curtain rod length A hacksaw to cut excess length from metal conduit (much easier than it may sound) Conduit connector(s) to join conduit into one rod

We used 3/4″metal as it was substantial enough without being so thick the curtain wouldn’t fit on it.
curtains naracoorte(If you’re using curtain loops or hangers, be sure to know their diameter so you don’t get conduit that’s too thick.)
zarya curtainsWe chose two 10′ lengths of conduit to give us enough length to pull the curtains completely off the windows. We used a hacksaw to cut down each piece to identical lengths. 3. Use a conduit connector to join the two pieces. We chose a very simple version; you’ll find several varieties at the hardware store and you can get a more heavy-industrial look if you’re into that. This particular connector was attached with just a screwdriver. 4. Mark where you want your conduit to connect to your wall or ceiling — we opted to connect to the ceiling for maximum curtain height — and drill holes for your screws.

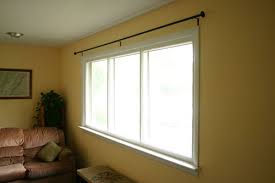
We used anchor screws to add stability. 5. Screw conduit clamps into the pre-drilled holes. 6. Slide in conduit. Slide your curtains onto the conduit. Tighten screws on the conduit clamps. (The above clamp is fitted over the conduit connector in the middle of the rod.) 7. Step back and admire! Told you we got a lot of late-afternoon sun. (The edges of the windows are exposed on purpose; the curtains are actually plenty wide enough to cover the windows. We just wanted to block the most blinding rays and still let in a little light.)Home Ec: How to Save Money on Window Treatments One of the most surprising home expenses that can build up quickly are window treatments. Every time I work with someone to help them find shades, curtains or blinds for their house, we’re both blown away by the price tags. Not that well-made textiles aren’t worth the cost (they are), but when you have more than a few windows, it can add up quickly and feel like you’re outfitting your entire house, not just the windows.

When we moved upstate I splurged on cordless Roman shades for the two rooms we live in the most (our living room and bedroom) and even those seven shades (purchased during a huge post-Christmas sale) left me reeling. So today I thought I’d tackle ways to bring privacy and sun-protection to your rooms without breaking the bank. Each of these DIY ideas can be tackled by a crafting beginner, even the roller shades, and can be done over a weekend — some even over just an hour or two. I’ve included a wide range of styles, from full curtains to decorative privacy film if you really want to let in as much light as possible. As with any textile, to give it the longest life, be sure to shake them out, lightly vacuum and dust as often as you can to prevent any set-in stains — and to protect your investment and DIY time! If you have any clever ideas for window treatments that you’ve saved money on or made yourself, we’d love to hear about them or see them in the comment section below.