ikea vivan curtains uk

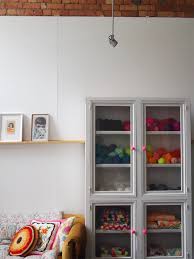
Back to top Privacy Policy Copyright © 2013 View Along the Way. “I need to go to IKEA, let’s make a weekend of it!” We got it bad! Our partners can confirm this quote is not an exaggeration but instead an accurate indication of how much time we’re willing to spend in the store. In our defence, they do put the clocks back, dim the lights (so inviting) and the beds are crazy comfy – why would anyone want to leave? And even when you are ready to go the only way out is by following the arrows past all the pretty. Be advised: never stray from the path or you’ll never get to make these crafty IKEA hacks for the home… We’re rather fond of Pip’s crafty cupboard. This revamp using Annie Sloan ‘Pure White’ Chalk Paint™ and neon door knobs is at the very top of our DIY list followed swiftly by more granny blankets and a trip to the yarn shop *air punch* – sweet! Get the DIY and find something similar like the HEMNES glass door cabinet at IKEA.
Arrange your vintage spool collection in simple wire baskets like these guys at Home Barn. While they’re sold out at Home Barn, you’ll find something similar at IKEA to display your treasures in. Nikoo turned this IKEA kitchen trolley into extra kitchen storage space all while giving us a way to show off the vintage crockery hidden in the cupboards. Quick trip to IKEA (be strong, you’ve got this!) then a quick DIY by Pear Mama? Super styler, Selina Lake knows how to put a room together. Get ideas over on her blog – and there’s no trip to IKEA required – use what you have at home! Then fancy up your curtains with Beckham and Belle’s hang-it-already sewing pattern. Gold star for everyone who makes this (and contributes to #worldpomination)! Finally a cool way to put those wallpaper samples to good use. This Little Street shows us how to turn an IKEA step stool into a quirky beside table with a lick of paint and that bold wallpaper we’ve been too chicken to stick to the wall.

How do they get their homes looking so… vintage? It’s the pastel touch! Spray cans at the ready, these inexpensive pendants are likely to be the only hack you need to achieve 70s-chic. How awesome do these 70s pots look on the kitchen wall? You don’t have to have a wood panel wall for this look to work either. White walls with neon hooks is a bright alternative. (Remember to save a kitchen drawer for the lids.) Glitter and the Girls knew she had to have a gold display cabinet in her home and she knew just how to get it. From this to this – GEEnius! Freshen up your desk with this hack by Cappello a Bomnbetta who shows us how using our favourite fat quarters can give desk organisers a totally different look. Get the DIY here and find the organiser here.You might not believe this, but out of all the works done to the van, installing the curtains was the most time consuming process . The Kangoo has 4 lateral and 1 back windows all in weird, fiddly shapes. Finding a cheap solution to install curtains was a real hassle.

Here is what you need to do: 1.Drill 4 small holes in the 4 window corners (for the screws), 4 on the two vertical sides (for the hook) and 1 in the horizontal sides (for the eyelets) with your 1mm drill bit.
aubergine zest curtainsIf you have carpeted your van, drilling small holes is likely to drive you crazy.
stylish curtains nuneatonIn case you didn’t know, the carpet favorite hobby is to snap your drill bits by wrapping itself around it.
elmo rod pocket curtainsI found that cutting a small split in the carpet to allow the drill to touch directly the metal part worked . 2.Screw in your eyelets, your hooks. screw in the screws but not all the way down. 3. Sew your curtains, by taking your window measurements, and creating a fold both on the top and on the bottom (this video might come useful).

If your windows aren’t a perfect rectangle, you might need a couple of try to make your curtains fit right. If you aren’t practical, you can always learn. Sewing comes very handy. If you don’t have a sewing machine, you can just hand saw. Yes it will take longer, but just because a car goes faster doesn’t mean you can’t enjoy walking right? 4. Cut a piece of picture hanging wire wide as the upper side of the window. Add 15cm or so to the width of the window. 5. This is the tricky part: wrap the wire around the left upper screw you previously fixed then screw in the screws all the way in. This way the wire should be fixed firmly. 6. Slide the upper side pocket of the pre-made curtain on the wire. Pass the wire through the middle eyelet. Pass the second curtain on the wire and then fix the wire on the upper right screw. Slide the end of the wire wrapped around the screw into the curtain pocket. 7. Repeat for the bottom side of the window. 8. Use the hole punch to create two holes on the left and right sides of the curtains in correspondence to the hooks previously fixed.