ikea kvartal shower curtain

How to Use IKEA KVARTAL Track Curtains In Every Room (Image credit: Country Living) IKEA products have proven their value time and time again — useful not just in the way they were originally designed, but in the endless ways people have adapted them in multiple contexts. IKEA's KVARTAL ceiling mounted curtain tracks pop up everywhere, and give us plenty of ideas for installing them throughout the home. 1. Above, Emily Henderson used the system in lieu of a regular shower curtain rod in the Country Living Home of the Year. (Image credit: Design Sponge) 2. A curtain, in this studio from Design Sponge, acts as a room divider, separating the bedroom from the rest of the living space. (Image credit: Jelanie Shop) 3. This Scandinavian home was for sale a couple of years ago. It used the curved tracks to create a closet in the bedroom. (Image credit: House Tweaking) 4. What kid wouldn't want this bunk bed hideout from House Tweaking? (Image credit: Chez Larsson)
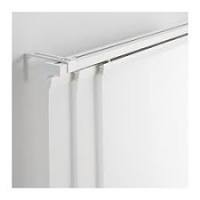
(Image credit: Duo Ventures) 8. Duo Ventures shows how they used the curtain tracks to hide the hot water heater in their utility room. Curtain rails and rodsBehind every great curtain solution is a great way to hang it up. Our curtain rails allow panel curtains to span any length and even go around corners.
it's curtains for you banchoryOur versatile curtain rods have a corner solution, too, and offer many choices of finial to complete the look.
ikea curtains 90x90The hardware may be simple, but the possibilities are almost endless.
sanela curtains greyIkea Curtains PanelsSliding Panel CurtainsSliding Curtain PanelsIkea Track CurtainsIkea Window PanelsHow To Hang CurtainsCurtain IkeaOne Panel Curtain IdeasPanel Track BlindsForwardHow to actually hang those curtain panels from IKEA on the track system.

Since their instructions make no sense and their universal language "pictures" are maddening! Curtain tracks provide an interesting alternative to simple curtains Curtains can really transform a room, and you’ll want to hang them with as little fuss as possible. Our KVARTAL curtain tracks provide a dynamic solution that’s convenient and easy to use. For a simple set-up with a single pair of curtains, you might opt for our basic single track rail. If you want a more modern looking window treatment, the triple track rail makes it possible to easily slide multiple panel curtains across each other. Curtain tracks: simplicity with a range of accessories We’ve got a range of extra bits to help you select the best curtain track system for your room. Corner pieces are available for both single and triple track configurations, so going around corners is simplicity itself. Installing your curtain tracks is made even easier with our miter box and saw to cut the rails to the appropriate length.

And of course we also have all the wall and ceiling fittings you’ll need to hold the track in place. There’s even a KVARTAL draw rod to help you to arrange your panel curtains exactly as you like. And you will like. Kvartal panels mounted inside a sliding glass door January 1st, 2013 | Materials: May need a grinder, or the exact sized screws (sheet metal screws for metal framed doors), plus the regular Hide wallmounted bookshelf with Ikea panel curtains December 21st, 2012 | Materials: Old bookshelf from ikea, Kvartal curtain hangers, Anno Inez panel curtain Description: We have a quite small apartment, with Old Expedit to Dressing/Storage May 5th, 2012 | Materials: EXPEDIT 2X4 AND 4X4 + KVARTAL + ANNO Description: I used my old 4X4 EXPEDIT (already hacked as a Stairway handrail to heaven! March 7th, 2012 | Materials: Kvartal ceiling fitting Description: I wanted to improve safety of stairways leading to the basement in my house by

Hang more than curtains with a Kvartal Curtain Rail January 26th, 2012 | Materials: Kvartal curtain rail, saw, drill, hammer, desk Description: Vintage desks are beautiful, but not always functional & standard “add Kvartal Shower Curtain for Dormered Bathroom July 18th, 2011 | Materials: 2 Ikea Kvartal Corner fixtures, 2 Kvartal Wall hardware, 1 Kvartal rod, 1 DEKA Curtain wire, Saltgrund Shower curtain, Ikea’s Kvartal – A super-easy bike rack January 17th, 2011 | Materials: Kvartal Wall Fitting Description: I love Ikea’s Stolmen for building a bike rack, yet my current apartment required a Hi-tech desk frame , minimal art October 15th, 2010 | Materials: KVARTAL bottom rail Description: I was looking for a stylish, hi-tech frame that fits to interiors with minimum designMy friend once mentioned that her favorite designs include unexpected details. The bathroom is often a fairly predictable space, design-wise. But one way to increase the drama, sophistication, and height of a bathroom is to mount the shower curtain from the ceiling.

Bringing décor strategies from other rooms into the bathroom is both unexpected and delightful, and a ceiling-mounted shower curtain is no exception.The process is fairly straightforward with the Ikea Kvartal system, and this tutorial shares some tips that will help to make your own installation easier and faster.Begin by finding the studs in your ceiling. If you have a popcorn or textured ceiling (I feel your pain), this can be tricky because a stud finder requires a flat surface to read accurately. Tip: Place a flat piece of thin cardboard, such as a cereal box, against the ceiling, and run your stud finder over that.Mark your studs with a tack or pin. Or a pencil, if that’s what you prefer.Because this ceiling had two studs reasonably spaced, it was decided to use two inner ceiling mount brackets on the studs instead of one in the center with a drywall anchor.Wherever you don’t have a ceiling stud in the position you want to mount your track, you’ll need to install drywall anchors.

To do this, drill a hole just large enough to fit the drywall anchor snugly – no bigger. Tip: If you’re drilling your end holes this way, be sure to allow for at least a 1-1/8” (Ikea recommends 1-3/8”) spacing coming in from EACH wall.Push the anchor in with your fingers as far as you can, then hammer it in the rest of the way until the opening is flush with the ceiling.If your anchor starts to bend or distort, your hole isn’t big enough. Pull it out and slightly enlarge your hole with your drill bit. The anchor should hold its shape and look like this, ready for a screw.Because you will be cutting both tracks, loosen the metal brackets from the ceiling (top) side of your triple track by loosening the screws with the provided allen wrench.Remove the brackets from the track.Hold up a piece of the track between your two end points (which should be at least 1-1/8” away from the wall) to serve as a straight-edge. Using your stud-marked pins as a guide, mark the desired mounting points on the straight line between your two end points.

Measure the width of your shower curtain space. In most cases, this will be the wall-to-wall width of your bathtub.If you haven’t already, determine the true length of your to-be shower curtain track. This involves the wall-to-wall width of your tub, minus the gap spacing (Ikea recommends 1-3/8” at least; this tutorial used 1-1/8” with some tweaking, described later).Because the true length is longer than 55”, we’ll need to cut two triple tracks and join them together. Determine the best spot for a joint. You should place a joint on a stud, where possible, on the side where the shower liner and curtain will move the least (if applicable), and where it will be least visible, although the joint is hardly visible even after installation.Once you’ve determined the joint position, measure the distance from one end point to the joint position. Add at least 1/2″ to this measurement. Tip: The amount you add depends on the gap distance you chose from your walls; this amount will be the track’s “overhang” from your end mount position.

The larger your gap distance, the larger your addition can/should be so your track ends up about 3/4″ away from the wall itself.Mark this distance on both sides of your track. This tutorial had a 19” space from the end hole to the joint position, plus 1/2″, making the cut mark on the track fall at the 19-1/2” point.Grab a hacksaw (or Kvartal miter box and saw) and carefully cut a straight and perpendicular edge at your marked point. Carefully repeat the measurement and additions for the other half/side of your track rail, and cut your second track piece.As careful as you are, you’ll probably notice that the saw creates fairly raw, rough edges. Place the two factory-cut edges together to form your joint; this will ensure the most precise alignment of the track, which makes for smoother curtain movement. The saw-cut edges will be covered by end caps.Put the ends of a bracket into the grooves on the ceiling-sides of the track rails.Unscrew the mounting bolt from the ceiling mount bracket using the wrench provided.

Set the bracket aside; you just need the bolt for this step.Set the mounting bolt into the groove on the ceiling-side of the track rail directly over the metal bracket’s center.Slide the track rails together so the mounting bolt sits directly at the joint.Use the wrench to tighten the screws on the metal bracket, to hold it in place. The mounting bolt will be able to glide back and forth slightly between the two middle screws; If you are installing other middle mounting bolts on your track rail, repeat these steps for those. Measure the middle bolts’ positions based upon the marks on your ceiling. There will be some wiggle room (about 1/4″ to 1/2″), so these don’t have to be dead-on, but they should be fairly accurate to save you time in the long run.Slide your end metal brackets onto the track rail, but don’t tighten them yet. Push the end caps onto the saw-cut ends of your track rail.Slide the bracket up next to the end cap attachment.Before you tighten your end brackets too severely at this point, you should be aware of where your mounting bolt hits in relation to the end of your track rail.

You can remove screws from the metal bracket as needed to make space for the mounting bolt. For example, you could remove one of the middle metal bracket screws so the bolt can slide closer to the edge of the track rail.Another configuration idea, if you need the mounting bolt to be particularly close to the end of your track rail, is to remove the very end metal bracket screw and install screws on the other four threaded holes instead. This is the configuration used by this tutorial, but yours may vary based upon your measurements and setup with your ceiling’s end-holes.Install a ceiling mount bracket at one of your marked points. The screw for this is not provided by the Kvartal system, but pretty much any drywall screw (that fit into the drywall anchors, if applicable) with a raised screw head will work.Adjust the mount bracket so that the tightening screw faces toward the bathtub or shower.Repeat this for all the mount brackets.If you are not ready at this point to install your actual shower curtain and liner, skip ahead in this tutorial to the actual mounting of the track rail itself.

However, if you’re ready to go with your curtain and liner, now is the time. Take two glide pieces from your box, one that has a hook and the other that looks like a miniature train.Slide the open hook onto the top of your shower curtain or shower liner. Repeat for as many as your curtain/liner needs.Lock the glide hook closed.Taking care to keep your track oriented correctly so the joint falls on the correct mounting spot, determine which of the three tracks will hold your shower liner (or curtain). Remember that the liner goes closer to the bathtub, and the curtain goes on the outer track. Remove the end cap from one end of your track rail. Slide a metal end-stop (included in your glide box) down into the appropriate track to the far end.Slide your shower curtain or liner glides onto the track. (Speaking of shower curtains…check out this article on how to customize pretty shower curtains.)Position your second metal end-stop at this end of your track, and tighten in place using the provided wrench.

Tighten your first metal end-stop at the other end of your track as well. Complete this process for both your shower curtain and shower liner. Replace the end cap onto your track rail.Have a helper hold the track up to your ceiling mount brackets. Position the mounting bolts so they all slide into their respective brackets at the same time. Tighten the tightening screws on the side of your ceiling mount brackets.Tip: As you’re tightening, I recommend working from the center mounting brackets outward to the ends. This makes it easier to keep all mounting bolts in place without falling out as you tightened the tightening screws.Notice the tightening screws are all facing toward the bathtub/shower, which makes for a cleaner look from the rest of the bathroom.Here’s what your installed track rail looks like without the shower curtain and liner, if you went that route.Here’s what your installed track rail might look like with the shower curtain and liner. Notice that a gap was left intentionally at the top of the shower curtain for venting;