ikea curtains merete
Last night, I hung my final curtain panel and breathed a sigh of relief and adoration…and exhaustion. I gave you a sneak peak of the curtains I had fallen in love with and decided to replicate in this post from Friday, but as promised, I am back with a full tutorial on how I got them done. Curtains like the ones in my inspiration photo, can cost hundreds of dollars per panel. Possibly even closer to a thousand. Considering our whole budget for our family room is $4000, I needed to get creative with my execution. Now, I am not the first person, and definitely not the first blogger to use drop cloths for curtains–besides popular, they happen to be incredibly thick, durable and inexpensive. I picked up 4-6’x9′ canvas drop cloths from Home Depot for around $11 a pop. Although they are all a natural, canvas color, the color can vary from cloth to cloth. I remember sorting through the stacks they had to find four that matched the most. I washed them all–twice (!) and loaded up on the fabric softener to get rid of any stiffness and smell that was present when I unwrapped them.

And then I ironed them. I don’t have a special, high-tech, expensive iron–which could be why this part took me some time, but I really think this is a crucial step. I blasted them with steam and took my time smoothing out any wrinkles or creases. I think the better they are ironed, the more expensive they look. The great thing about these drop cloths (besides the price, thickness, size, yadda) is they come hemmed on all four sides. I still broke out my sewing machine because I didn’t need my curtains to be 9ft long.
extra long shower curtains 210cmSo I cut off the excess and re-hemmed the bottom and tucked my sewing machine away again.
curtains se23I suppose you could use hem tape for that part, but I didn’t have that and I had already had enough ironing.
orange curtains 90x72
And then it was time to attach the ribbon. Before I decided to do this, I was worried about where I was going to find 60 yards of grosgrain for a reasonable price. The Ribbon Retreat came to my rescue! They have every kind of ribbon in every color imaginable. Here’s a small sampling of some of the 111 different colors of grosgrain ribbons they have: And they have multiple sizes of each, too. In the end, I went the safe way–black in 1.5″ wide. They were so excited about my project, they sent me the ribbon for free, but 60 yards would have only set me back around $25 normally–which is a steal.
target thistle shower curtain The high-quality ribbon arrived in a long spool and I was ready to attach it. I used my glue gun–which turned out to be the best for me–a girl with no hem tape, little sewing skills and a loaded glue gun handy. Adhering the ribbon took so long because I wanted make sure everything was spaced evenly and glued well, and then, of course, there is the fact that a double row of trim around 4 extra large canvases just takes time.

I scooted our level around with me to serve as a guide, lining up the edge of the level with the edge of the canvas and securing my ribbon right next to it. And when one row was done, I moved the level-turned-spacer in and repeated the whole process. When it came to bordering the corners, I knew I didn’t want to cut the ribbon and have to worry about frayed edges, so I folded, creased and glued to make it look like two pieces came together. I used curtain clips from Ikea, $3.99 for 10, on each panel. Once the ribbon was on, while the curtain was still laid out, I placed each clip 7 inches apart to make a handsome fold once they were hung. Speaking of hanging, with our blinds in place, we needed our curtain rod to come out from the wall a little farther to clear the blinds and allow them to hang freely. We picked up the brackets from Ikea, that were extra long and held our rod a good 6 inches from the wall. There you have it (I hope I covered everything)–Our double-trimmed drop cloth curtains for less than $50.

If we paid for the ribbon, it would be right around $70….for FOUR curtain panels. Still an amazing price and far less than one panel would cost to purchase. Here’s the best shot I could get to show off the softness of the canvas panels. I love the juxtaposition of the blinds and the drop cloth and the ribbon. And a wider shot of the room (I think Greta is hiding behind the right curtain on the far side of the room). We both love the curtains. Really, really love them–even if I did complain a few times during the process. Anyone else making curtains lately? Or maybe you are ready to try these–did I skip over an important detail you are wondering about? Are you as stoked as I am to find a site with such a huge array of ribbon colors!?Get Playful with Pom PomsGet Playful with Pom PomsNeon yellow trim with dangling pom-poms adds texture and serious fun factor to all-white curtains. We love that even the curtain tie features the same matching details.Get the tutorial at Beckham + Belle »

Paint Nautical StripesPaint Nautical StripesThe trick to making perfect navy lines across an all-white curtain? Painter's tape of course. The same stuff that works on your walls will ensure the edges on your stripes are straight and the same size.Get the tutorial at Jenna Burger Design » 21 Lovely Ways to Repurpose Your Wine CorksQuick review: when we first realized we were going to need a nursery (and that we didn’t want to give up the guest room for it, at least not right away), we planned to hire someone to put up a wall with french doors, dividing our ginormous (29 by 13) master bedroom into two sections. Then this started to seem….expensive. More expensive than necessary. So we switched gears and decided to put up a cheaper and more temporary room divider of some sort instead. When we last left off, Dave and I were staring helplessly at the Kvartal curtain hanging system section at Ikea, thinking that surely if we went around a corner there would be a useful (and very lengthy) explanatory poster of some sort, or maybe an actual full time Kvartal assistant to answer our many, many questions.

If there’s one thing Ikea’s short on, it’s explanations. We finally gave up, figuring that when we returned sans kids everything would make itself clear. This did not happen. We found ourselves there again, weeks later, no kids in sight or earshot, just as confounded by this mysterious “system” Ikea had come up with. As near as we could tell, the deal is that if you want to use the Kvartal panels, you are in pretty decent shape: They fit right into the little Kvartal track, and you can slide them around, and all is well. But this is not what we wanted. For one thing, the selection of panels is a little lacking. They come in very limited colors and patterns, and all the ones that might have worked were very thin and translucent. I know anything short of a real wall isn’t going to offer a whole lot of privacy, but we did want something we couldn’t actually see through. Ikea also needs to replace the display Kvartal panels a little more often if they want to move those things.

The ones there were all beat up and frayed and looked like they wouldn’t last an hour in our house. (Is this the part where I add a disclaimer that Ikea is not compensating me for my opinions on the Kvartal system? you know I love you and lust after your Strandmon chair, but the Kvartal stuff needs some work, IMHO).If you are not impressed with the panels and want, instead, to get some of the regular old curtains that are “compatible” with the Kvartal system….you would think “compatible” would mean there is some way to just buy the curtains and the track and some kind of….clips or something, and go hang your curtains up, right? This certainly does not seem to be the case, even though we spent a lot of time in Kvartal-land, examining every Kvarcessory and trying to make it so. You do buy little packs of clips to fit into the tracks. But then you also have to buy this strip of clip-holding fabric that you take home and sew onto the backs of all of your curtains before you can use the clips.

I do own a sewing machine (I don’t know where it is right now, but I know there’s one in the house somewhere) and I guess, in some very generous definition of the word, I “know” how to use it. But I prefer not to. Sometimes I see people on the internet make cute pillows and whatnot, and I think, “maybe I should do that sometime.” And then I don’t. The idea of sewing something like 18 feet of this little fabric strip thing onto the backs of curtains made me want to cry. “I think you can do that,” Dave encouraged me. “Maybe Kristi would help me,” I said doubtfully. The end of the saga is that we finally decided the Kvartal system was too much trouble for too little payoff and that there MUST be an easier way to do things. We left Ikea with some cheap curtain rods and hardware that we hoped to somehow rig up so that they would hang from the ceiling instead of the wall and 6 white (non Kvartal compatible) curtain panels that we intended to put on said cheap rods:

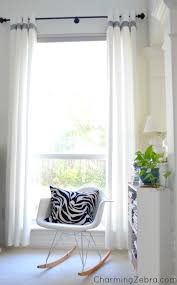
Merete curtains, $24.99 for two panels Then we came home and thought about it for a long time and ran into a few flaws in the plan that would likely make adapting our cheap Ikea rods and hardware more trouble than it would be worth. Also, we thought to ourselves, we couldn’t possibly the only people who’d ever wanted to hang some curtains from the ceiling to make a room divider. Google and Walmart came to our rescue. Walmart’s website sells exactly what we needed, which turned out to be the Verona Ceiling Mount Curtain Rod. We ordered three of them, waited for the notice that they were ready to be picked up at the closest Walmart, and we were ready to hang a room divider! (Walmart’s not paying me, either. Not all of my opinions on Walmart are as positive as this one about how easy it is to get ceiling mount curtain rods from them). Update: Looks like those curtain rods are out of stock at Wal-mart right now, but I found a similar system on Amazon (affiliate link): Levolor ceiling brackets

Then we got to work! First we had to decide how big to make the nursery part of the master bedroom. The final decision was more or less arbitrary, helped along a bit by outlet placement….we ended up deciding to put the curtain 10 1/2 feet from one wall. So the final dimensions are something like 17 1/2 by 13 for the master bedroom part and 10 1/2 by 13 for the nursery. Next we made marks on the ceiling in several places to make sure the curtain would go straight across the room. I stood on a step stool by the wall and held one end of the tape measure while Dave stood 10 1/2 feet or so into the room on a stepladder, held the other end, and made Xs in pencil. Then we moved the ladders a few feet and did it again. Then Dave took the first picture of me ever to appear in this blog, I believe. And yet on a stepladder. I am SO dedicated. Also, you can get a preview of the Newburg Green, albeit a cruddy, flash-illuminated one. I am very in love with it. Then I sat on the bed with my laptop and ordered pretty lamps for the nursery and picked out fabric for curtains while Dave screwed the brackets into the ceiling with anchor screws and cursed a lot.

This was a tedious process. We had three rods, and each needed three brackets to hold it. We decided to put the middle one just behind the ones on either side, so that the middle curtain panels could overlap the ones on the sides and not leave any gaps. Then we put the curtains on the rods, the rods through those little loops, and we were done! The curtains are 8 feet long, and so are our ceilings, so it worked out very nicely. They’re almost flush with the ceiling and they pool on the carpet just a tiny bit. Here it is in the light of day, all finished! There are six panels total, so we can open it up anywhere, but there’s probably going to a dresser on the other side in the middle, so we’ll probably mostly use this spot as the “door.” It’s closest to both the door to the room and to where the crib will be, so, assuming I’m growing a baby who will stay asleep for transfers to the crib, that will be convenient. In case you’re wondering why we forgot to paint the bottom half of the wall there, that’s where the board and batten is going.