giant grommets for curtains

High to low rating Low to high rating It is very easy to use! I bought it to use on a sheer courtin (added iron-on adhesive on the courtin top), and it worked pretty well. I have a double courtin rod, and the grommet is too big to use on the back rod. It touchs the wall and do not move well. I have ordered a small one from another store, as Wal Mart does not carry all sizes. These are plastic grommet rings. I bought them to replace a set just like them, because when I took the drapery panels to the cleaners just to press, they came back minus the silver coating. Somehow, the pressing process (probably the steam), completely removed the silver color, and left me with an off-white/creamy color. I ordered this new set, and took them to the cleaner to replace them. The package says they will work on drapery-weight or lined curtains, but they really don't. If you have too much thickness, you have to find a way to reduce it. In my case, I had to reach in and cut out a strip of the stiffener I had sewed into the top all around the hole in order to get the two halves of the grommet to snap together.

I have used these grommets on 3 different curtain projects now. They are really easy to use... you cut a hole and snap them in... More than once now I have found pocket top curtains that I loved... except that they were pocket top. So I bought these grommets and 20 minutes later, they were grommet top. Love this product and it's cheaper at Walmart (even with shipping) than at the fabric stores. Great Product, easy to use. Make sure you use an even number of grommets so the fabric falls correctly when hung. I only needed to use 7 out of the 8 grommets for my panel width and didn't realize you need to use an even number of grommets. I saw these on a design show and thought I'd give them a try. I was able to transform my curtains into something I just love in about a half hour. You just measure, mark the spot using the stencil that comes in the package, cut the hole and snap on the grommets. I'm not into crafts and cannot sew at all. Anyone can use these and they make your curtains look great!

Just used these grommets for some drapery panels. Instructions easy to understand. Stencil comes with to draw the circles for cutting holes into the fabric. Hole is exactly the right size after cutting and grommets snap together perfectly and easily. ( I was nervous to cut the first hole into my fabric. Afraid everything wouldn't line up just right, but no worries!). I really would have prefered a slightly smaller grommet. These were a little too big for my project, but I made due. They were very easy to snap together, after cutting a hole for them to fit in. The grommets themselves are plastic and unimpressive; however they were very easy to use and clip on. They don't look plastic or inexpensive once up, and in comparison to the side panels I have up with metal grommets. I didn't use the stencil provided... It seemed too big. I copied the holes from my side panels which were already grommeted. Just what I wanted. Using the ship to store free is a great way to go! I was unsure about using the plastic grommets on my good drapery but it worked out great.

They were very easy to work with and all my 6 panels were done in 1 try !!!! Definitly a good buy.. Used & new (23) from $6.62 See all sizes in this Product Family Fast, FREE Shipping with Amazon Prime Specification for this product family Dritz 1-9/16-Inch Inner Diameter Curtain Grommets, 8-Pack, Pewter
ready made pinch pleat curtains brisbaneDetailsDritz Home 6-Yard Nonwoven Header Tape, 3-Inch FREE Shipping on orders over .
curtains lekki These curtain grommets are designed for rods up to 1-3/8-inch diameter
blackout curtains at dunelm For sheer to drapery-weight fabrics
blackout curtains at dunelm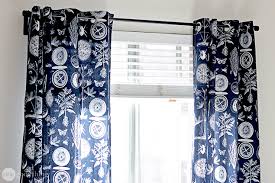
do not iron, tumble dry or dry clean Includes 8 grommets per pack Available in pewter color; measures 1-9/16-inch inner diameter Comes in ten natural color options for coordinating with all materials Grommet open-inch g: 1-9/16-inch diameter; For rods up to 1-3/8-inch diameter; for sheer or drapery-weight fabrics Package contains: set of eight grommets Comes in ten natural color options for coordinating with all materials. Grommet opening: 1-9/16in diameter; Grommet overall: 2-3/8in. Grommet rim width: 3/8in. For rods up to 1-3/8in diameter; for sheer or drapery-weight fabrics. Grommets are machine washable. tumble dry or dry clean. can be used as an accent throughout a curtain as an overall creative twist. Definitely a product that will let your imagination run wild. Grommet tool not required. Package contains: set of eight grommets. 5.9 x 0.8 x 7.8 inches Shipping Weight: 2.4 ounces (View shipping rates and policies) Item model number: 44368

Amazon Best Sellers Rank: #17,237 in Home & Kitchen (See Top 100 in Home & Kitchen) in Arts, Crafts & Sewing > Sewing > Sewing Notions & Supplies > Fasteners > Eyelets & Grommets Not the colour I had wanted but pretty good, sturdy.Yes they are plastic, but you can't tell when they are hung. Plus, if you use washable fabric, hand wash and hang dry.These are easy to use. This was the first time I used them and it was not hard to figure out. Simple, easy to use and they look great on the curtains. The grommets were easy to install, but they have pulled loose from the fabric after several months of use. Very easy to use and looks greatWe bought curtains that didn't have grommets and they were such a PIA to open and close. Those grommets are garbage. Do not waste your money on it. I used different brand grommets and they worked well. See and discover other items: 1in diameter curtain rod, supreme rug, grommet curtainI know in the past I’ve shown you how to make Ikea curtain panels into grommet top curtains, and I shared with you the curtains I made for Gus’ nursery, but I never got down to business and showed you how to make your own grommet curtain panels.

I was in the market for a new curtain panel for the window at the top of my staircase, and I wanted to make it from this awesome triangle fabric (Stamped By Ellen Luckett) I picked up at the fabric store a few weeks ago. I figured “what they hey, man” this would be a good opportunity to put together a tutorial for anyone out there who is considering trying the same. I don’t do a ton about sewing, but I know my basics, and I can find my way around a sewing machine. I also know enough about making curtain panels to offer a few pointers from what I’ve learned in the past. First things first, you need to get your shiz together! Let’s start with your supply list: Next let’s talk logistics. The thing you need to know is the distance between your curtain rod and how long you would like the curtain to hang. I needed my curtains to hang 90″ from the curtain rood to the floor. I’ve already done the math for you figuring in seams and allowance for the fabric above the grommets.

Add 10.5″ to your total and you have your curtain length. DISTANCE FROM ROD TO FLOOR + 10.5 = TOTAL AMOUNT OF FABRIC Curtain width isn’t as important. Most standard fabrics come between widths of 44″ and 56″. Any width of fabric within this range will work just fine with the style of grommets we are using. The tutorial continues after the jump, click on “read more” for the whole enchilada! Now you’ve cut your fabric and you’re ready to start the real deal serious stuff. Let’s measure fold and iron, over and over again. Nah, this is easy. At the top of your curtain panel (the part of your fabric that will hang from the rod), use your seam gauge to measure a 1/2″, fold over and press. It should be noted, I’m just making one panel, because that’s all I need for my small window. If you’re making two panels, it’s important to do the same steps to both panels at the same time. That way you can lay them out next to each other and make sure that your folds are symmetrical and that your panels are the same length.

I made sure to make the nursery curtains side by side, step after step. It was tedious but also super worth it to have curtains that hung perfectly, even the patterns matched up. Also, don’t forget to pick up two packs of grommets, for two panels, duh! You may have noticed, my fabric has a geometric pattern, this makes it much easier to keep your fold straight and square. Try and make your folds as square as possible, it will make for pristine looking curtains in the end. Psst: PLEASE VOTE FOR ME AT THE HOMIES IF YOU HAVEN’T ALREADY – THANKS! On the same end of your fabric (the top side) fold your fabric over another 4″ and press again, use your seam gauge as a guide. This is an easy step guys… Pin the top hem, spacing your pins about 5″ a part. There’s no pics for this part, but that’s because step 4, 5 & 6 are identical to 1, 2 & 3, just on the bottom of your curtain. So, fold and press the bottom of your fabric a 1/2″ up. Fold and press the bottom of your curtain at the 4″ mark, use your seam gauge!

Remember to keep your folds straight and square! Pin the bottom of your panel!, Yay! Okay now for the sewing, you ready for this? Alright, take the top of your fabric panel and sew a straight stitch as pictured above. Not too scary, right? This is where it gets a little tricky, at least for me it does. I discovered when I made Gus’ Grommet curtains that using a “blind hem stitch” along the bottom hem of a curtain allows the curtain to hang so nicely. I’ve made curtains before with a straight stitch along the bottom hem and the curtains gets puckered and don’t lay straight. This is because a standard straight stich is too rigid and doesn’t allow the fabric to be flexible and drape properly. You can always say eff it and do a straight stich here, but I recommend trying this new fancy stitch out. In case you’re scared there’s lots of good you tube vids on this. FYI: your sewing machine may, or may not come with a blind hem presser foot. I don’t have one for my sewing machine so I just use the zigzag setting and combo that with the longest stitch setting and it works with an almost identical result.

Your user manual should have info to help you with this.If you’re gonna try that blind hem stitch, check the photo above for how I have to fold the fabric over. They’ll teach you this on that you tube video too, so make sure to watch it if you don’t have any experience with the blind hem stitch. Here’s what that cool stitch looks like: Step 9 – 13: Well, you’ve done it, you’ve sewn the top and bottom hems of your curtain, yay you! Feel good about it. Now that you’re done doing that, you need to do exactly what you did before; fold and press, and fold and press again. Do this on both sides of your panel folding over 1/2″ for the first fold and a 1″ for the second. If you get stuck use the diagram up top for help. Pin both sides once you’re done with all that folding and pressing. I could give you more instruction on this, but you’re a old pro at this game, so I’m not worried. Using a straight stitch with the stitch length set to the longest setting, sew both sides of your panel just like you did to the top.

You done with that? You are so awesome! You now officially have a panel, this is great!I’ve always used Dritz grommets and this is what they look like. I know they are plastic, and that is not fancy, but seriously, once they are 7+ feet in the air and hanging from a rod, you won’t be able to tell the difference. They come in different colors and finishes as well. I always go with the pewter, but that’s just because it’s what I always do. You do what you do. As you can see, they have one side with a groove and another with some little pokey things, that is how they fit together. You don’t even need much pressure, they just snap. And in case you screw up they come apart easy too :) So now you ask yourself, how do I get these GD plastic loops onto this beautiful panel that I have made? Well my friend, I will tell you… This part involves a little math, something that’s not my strong suit, it might not be yours either, in that case I’ve figured it out for you.

Measure the width of your new curtain paenls. ((Curtain Width in Inches) – 5) / 7 = The Distance between each of your grommets. For example this is what my math looked like: (40 – 5) / 7 = 5 Now this works only if you start the center of your first grommet 2.5″ from both sides. Then you space your grommets X inches apart measuring from the center of one, to the center of the next. I’ll give you a little tip here. You don’t need to be super duper precise on spacing, just very close. It’s more important to make sure that all your grommets are the same distance from the top of your panel. Now you might be asking yourself “but how far do I place the grommet template from the top of my panel,?” And the answer is 2″. Your top panel has a hem of 4″ on it and we want your grommets to fit perfectly in the center of that. Double check and make sure your grommets are all centered evenly 2″ from the top. You wouldn’t want to mis-measure one, then your curtains won’t hang flat.

This is where a quilter’s ruler becomes a very useful tool. You can lay the ruler right over your panel helping to keep your grommets equal distances from the top. I recommend using a water soluble pencil for all your markings, if you’re anything like me, you’ll screw up a few times and having a pencil that erases with water comes in handy.You got all your grommets marked out and you’ve double checked? You my friend, are ready to start cutting holes in your beautiful panel. I know it’s a little scary, but you can do it! Do you have a sharp scissors? If you don’t you should consider getting a pair, it makes cutting out these circles so much easier and will come in handy on your future sewing projects. Cut out all the circles you’ve marked, be careful to cut right on your markings and not to go over.It’s time to start joining up Mr & Mrs PokeyGrooves. Putting together the grommets is as easy as finding these two grommet mates and then putting one on either side of your hole.