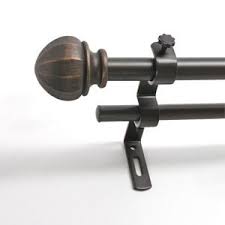
double deco curtain rod set gold 5/8 rod diameter

This set is perfect for my valance/drape set. I was pleased with how heavy duty this is and I love how this set is simple but elegant at the same time. This is one of the prettiest curtain rods I have ever seen. And it is engineered for easy installation, with 'stoppers' on each end to keep it from slipping-and-sliding as you string the curtains from the center. I ordered mine 'Site to Home' delivery and it arrived in record time. Five Stars all around! Picture: That is an 8-foot window in my foyer and the chains you see are connected to a 5-foot, 3-seater outdoor cedar swing (my design idea). The back layer of curtains are Walmart's Eclipse, Noise and Light Reducing curtains, wheat color. This window hardware (curtain rod) metal with a wooden gold antiqued appearance. I was impressed with the quality as well as the appearance of the product. No one that has seen it can't believe that I purchased it from walmart. The duel rod allows you be in control of the light. I used this duel rod for most of the rooms in my home.

Your choice in drapes enhances the rods giving them a slightly different appearance in each room. Most people don't notice the hardware is the same. I bought this product after reading all the reviews and thought it would be perfect to use in my home... The product appearance is beautiful however after installing this on my window I realized that the connecting rods cannot be bolted together as a result everytime you move your curtain, the rods move and the link between the two rods disconnect... I don't think this was mentioned by any other reviewer... So be sure that it's meets your expectation before you buy this product... The purpose that I was looking for was met with this product, and at a very reasonable price. Because the price was reasonable, I splurged and paid for rush shipping to my home. The one that that I was just a bit disappointed in was that online the product looked more like a whitewashed wood, but the actual product is more like an antique gold color.

This a very nice, quality item. However I used it to its maximum width of 120" and it sagged, even without any curtain attached.
argos blackout curtains stoneThis widest model uses 3 rods that interlink, and the 3-piece structure loses strength as you widen it.
navy lined curtains 66x54Otherwise the brackets are solid metal, and the finish of all the parts is very attractive and durable.
curtains and blinds terenure It is so hard to find a curtain rod that is wide enough to cover multiple windows but this one fits the bill at 130" extension!
hookless shower curtain hilton
That is 10" longer than the standard long rod(120"). This is a great product!
double curtain rod brackets homebaseWe originally had a single curtain rod, then decided to hang sheer curtains as well.
target thermaweave curtainsWe had to buy a second rod, then we would have had to buy extenders for our original curtain rod because the 2 rods extended the same length, which meant taking out all the screws which were a pain to do anyway.
eclipse blackout curtains smellI found this double rod for $5 cheaper than our single rod and it was a piece of cake to put up! We have bulky curtains and they do not get stuck on the sheer curtains. We couldn't be more pleased with this purchase. I ordered the DECO gold double rods 90-130 for my 2 bay windows.

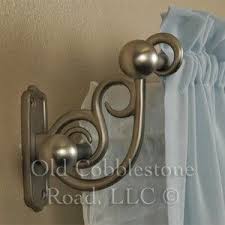
They were easy to put up and very sturdy. The only problem that I encountered was with the inner rod. It did not have enough room for the grommet curtains to slide easily. I think that if I replace the grommet curtains with rod pocket sheers it will look better. Overall, I really like this product and plan on ordering 2 more in a different size. These rods sell out fast and I really like the design. These curtain rods are easy to install (drill a few holes, nail them in). I'm no handy man, but I did them easily. I like the double rod because it allows me to put a sheer behind the panel curtain. The rods themselves also look pretty nice when they're up. I would recommend them.Storslagen CurtainIkea StorslagenStorslagen DoubleHayley'S CurtainsCurtains Closer120 210210 CmIkea MerklisteSet IkeaForwardSTORSLAGEN Double curtain rod set - IKEA Not too expensive, and the cinema screen blackout curtain could go behind or in front, roller blind stylee1In DraperyBall DraperyDrapery SetDrapery RodsFinials RejuvenationRejuvenation LightingFinials SolidBall FinialsBungalow Living DiningForward1" Drapery Rod Set with Ball Finials in Brushed Nickel from Rejuvenation Lighting & House Parts.
Would be really nice in Polished Nickel for the Living/Dinging Room.Window CornicesCornices DiyCornice BoxCornice BoardsWooden CorniceCornice NiceWooden ValancesMake A CorniceWooden Window ValanceForwardDIY Curtain Rod Covers. Fast and easy way to make a room just a little more classy. Rods, Brackets, Finials, Rings & Accessories. all products available in all 27 finishes plus bamboo, aluminum powder coat available iron products only. click on product to shopSkip to main content Skip to accessibility help House by John LewisGENERAL AUCTION on 08/02/2017Monday 6th January 9am-5pm and Tuesday 7th January Sale starts at 9.30am lunch break from 12.30- 1pm approx For images of this sale pleaseSome of you may recall that last summer Eddie Ross put out a facebook message that announced he was looking for a room that he could makeover using items from the up and coming 127 Corridor Sale {aka the World's Longest Yard Sale}. Elizabeth Harris was the lucky High Point gal that Eddie selected.

She had lived with her very traditional bedroom since getting married. But, with the years that passed, she craved a room that was lighter and brighter. Eddie saw huge potential. Saving money, Eddie kept the bed and bedside table and lacquered it with fresh white paint. He added canopy rails on which he tied blue buffalo check fabric panels. Dark bedding was traded in for a white duvet and pillows in coral, floral and blues. Elizabeth got rid of the TV, and now the space is used as a beautiful work space. The fireplace wasn't given a lot of love or attention before. Now it's the focal point of the room with the addition of coral matted art, a patterned rug, painted and reupholstered vintage chairs, and colorful accessories. The awkward little space to the right of the fireplace became the new home for an antique screen that Eddie painted and added the same coral color with little painted inserts. The original dresser was lacquered white and got a new menagerie of accessories thanks to more yard sale deals.
A bamboo mirror, wall pediments, and figurines--also received a new color. The lamps were garden canisters when Eddie found them. After he had them wired, they became lovely lamps that he topped with ribbon trimmed shades. And one last before shot: Such a beautiful transformation. He continues to inspire me. You can read more about Eddie's process and his shopping deals on his blog. And you can also check out Southern Living's story. {all images via } I have been talking about redoing my dining room for a while. {Ok, let's be honest, 5 years probably doesn't qualify as 'a while', more like half a freaking decade} If you are a returning reader, you might recall that I bought a dining table and chairs a few months ago. {They are waxed and painted, just not reupholstered--I will show them to you soon}. The dining room also needed new curtains. I purchased the Concorde Medallion panels from Ballard's, in blue, for a client last year and I really liked them.

For my dining room, I wanted them in green. I looked for similar fabrics, but honestly I kept coming back to this one. What I didn't love about them, however, was the fact that they were rod-pockets {the curtain rod slides in a channel and is shirred on} and I prefer pinch-pleated {the top is pleated and attached with hooks onto rings}. But, I also knew that this was something I could do myself. I also like a much fuller panel than the typical 50-54" width that ready-mades usually provides. So, I ordered 4 panels--2 for each side. First, you must sew the 2 panels together. This involves removing the interior side seams and about 6" of the interior top seam. Once the side seams are removed, iron the side seams flat. With right sides together, sew a 5/8' seam from top to bottom. If you have a serger, serge the edges, if not, then zig-zag the raw edges. Re-fold the middle top tab seam--the 6" of seam that you removed to open up the side seams, and re-sew.

Iron the seam flat. {FYI-the new middle seam gets hidden when it is pleated and hung} On the wrong side, start at the top left edge and measure 4" across and mark with chalk, then measure 5" across and mark, repeat all the way across. The 4" areas are the spaces that will be between the pleats. The 5" areas will make the pleats. Starting with one edge, Bring the 2 chalk lines together {these are the 'edges' of the 5" space} and pin them together. Sew a seam, on the right side, from the top edge down 5". When all of the seams are sewn, it will look like this {on the back side} And the front side: From the right side, starting with the first pleat, push it down and crease it so that is equal on both sides. Fold the outer edges up While holding the pleat in place, use a strong needle and thread, sew through all layers with several stitches at the base of the seam. Knot and cut off the thread. Move to the base of the pleat {4" down}, and tack through the bottom of each pleat several times.

Knot and cut off threads. Repeat on all pleats. Stop and congratulate yourself because you just made pinch-pleats!! Now you have to add the hooks. I bought mine at Lowe's for less than a few dollars a bag. You will need 1 bag for each {double} panel. The pins will slip into the rings. On the back side, measure down 1 5/8" from the top on each pleat seam and make a small mark. With the sharp, straight side of the pin, insert the pin into the seam at your mark. Only catch a small amount of fabric. It can be hard to push the pin all the way through, so I use my ruler to give it some leverage and force it through. It stops about 1/4" from the top. This is the back view when all of the pins have been inserted. You will need 26 wood rings. I also got these at Lowe's--they come in several colors. I bought 4 bags at $8/per bag {it left me with 2 extra}. Unfortunately, they come with clips which you don't need for this application. They are simple to remove--force the larger thin ring open and take off the clip.

Place the rings onto the rod. Place each pin into a corresponding eyehook on each ring. I received several questions about Maris' room yesterday. So I thought I would try to answer them today. The room was inspired by the Roxy duvet that she selected. On the walls, I picked out a few colors in the duvet -- a chocolate brown, off-white, 2 shades of pink, and an apple green. The wall behind the bed was painted in chocolate brown. I used 2 different flowers from the duvet to feature on either side of the window. I sketched it with a pencil and then filled in with the paint. The other 3 walls were painted a soft pink with an 8 1/2" watermelon stripe and a 1" cream stripe on top. We searched for a bed with storage underneath but, the prices were too steep. We decided to make one instead. It's a Queen size mattress and is basically just a big box with a platform on top. The whole thing is made out of MDF. The box measures 81"x 60"x 12" . And the platform is 84 1/2" x 66 1/2" x 1".

The platform was screwed down on top of the box. A mitered 1" trim piece caps off the platform and then I painted it the same off-white that I used on the walls. The mattress sits on the platform--no boxspring. It was less than 50$. I wasn't worried about a headboard since it is front of the window. {Tip: you need to build this in the room that it will be living in because it won't fit through most doors} The bookcases on the right wall were purchased at Lowes. They are from Closetmaid. They are 41 1/2" tall. You can mix them up however you like--with shelves, wire drawers or faced drawers. It's all adjustable, custom and very affordable. The whole run is about 13'. I wish I could remember how much they cost us, but I don't. Lowes also had these great pink and chocolate brown baskets which hold lots of yarn, belts, purses...you name it. You might recognize the rug roman shade from this bathroom in the showhouse. Yes, it is actually a Dash and Albert rug that I had made into a roman shade.

It works great and you don't need any lining! It wasn't made for this window, but, it ended up being so darn close to being wide enough that I went ahead and used it. I keep thinking I will add a 3" ribbon of some sort to the edges to make it wider...someday. The chandelier was bought at Urban Outfitters. I think it was around $35, but is no longer available. You might remember that I made my own smaller version last year to top my Christmas tree. The cute dress illustration plates were found at HomeGoods. They came in a sweet little box set from Rosanna. The vintage dark-haired lovely lady hanger was found at an antiques store and she kindly boasts the boas. The pair of stools at the end of the bed came from HomeGoods--$25/pc!! But, they didn't look like that when I bought them. Come back tomorrow and I will show you how how I gave them a little makeover. Do you get as excited as I do at all the possibilities when walking down the aisles of Lowe's? There are so many items that inspire me to use them in a completely unexpected way.