detachable blackout curtain liners
Used & new (23) from $22.52 Fast, FREE Shipping with Amazon Prime See more product details Shop products for every room in your home from your Garage to your Kitchen. Thermalogic Ultimate Window Liner - 45"W x 77"L FREE Shipping on orders over . DetailsDritz 44328 PinOn Drapery Hooks, 56-Pack FREE Shipping on orders over . DetailsEclipse Thermaliner Blackout Panel Pair, White. FREE Shipping on orders over . Special Offers and Product Promotions Save Big On Open-Box & Pre-owned: Buy "Thermalogic Ultimate Window Liner - 45"W x 77"L” from Amazon Warehouse Deals and save 37% off the $35.99 list price. Product is eligible for Amazon's 30-day returns policy and Prime or FREE Shipping. See all Open-Box & Pre-owned offers from Amazon Warehouse Deals. Multi function curtain liner. Polyester and cotton blend insulated curtain liner for energy savings, naoise reduction, and light reduction. Size 45-inch wide and 77-Inch long. 77 x 45 x 1 inches

Would you like to tell us about a lower price?
made to measure curtains witney See questions and answers 5 star74%4 star15%3 star5%2 star3%1 star3%See all verified purchase reviewsTop Customer ReviewsSecond thoughts about these liners - read my updateWorks great, just bought anotherWorks awesome, slight plastic smell Chemical odorWorks great and NO smellThey are perfect and worked out for me. Rings won't fit on a 1-3/8" Diameter Rod See all customer images Most Recent Customer ReviewsSearch Customer Reviews Set up an Amazon Giveaway Learn more about Amazon Giveaway See and discover other items: white linen curtain panels, blackout curtain liners, white blackout curtains, black curtains for bedroom, soundproof curtains, white cotton curtainDetachable liners increase the functionality of the curtains. A curtain liner offers increased privacy, reduces sun damage and helps prevent heat loss, or gain, in a room.

Detachable liners offer versatility in managing the curtain's functional requirements through the seasons, and they don’t interfere with the cleaning requirements of the curtain as they can be detached and cleaned separately. Choose a blackout lining for maximum coverage or a sheer for just a bit of coverage and a lot of design punch. Lay the curtain panel on the table, wrong side up, and measure the panel from side hem to side hem across the top as the flat width measurement. Measure from the top of the drapery pin to the bottom of the hem for the finished length. Count the number of pleats and spaces, and add to the flat width measurement 1/2 inch for ease in each space. This is the finished width of the liner. Cut the drapery lining width equal to the finished width measurement plus 4 inches. Cut the length equal to the finished length plus 6 inches. Sew panels of lining together as necessary to achieve the required width. Turn the bottom hem up 2 inches toward the inside and press the fold.

Turn an additional 2 inches and press. Sew close to the second fold. Turn the top edge over 1 inch and press the fold. Turn an additional 1 inch and press. Turn each side edge 1 inch and press the fold. Turn again 1 inch and press. Stitch close to the second fold. Lay the curtain panel flat on the table, the top edge toward you. Place marks 1/2 inch from the top edge and equidistant across the top edge corresponding to the number of pleats on the curtain panel. Include the 1/2-inch ease in the space between marks. Sew a small button hole at each marked location and slip the liner over the drapery hook to install. Measure the width of the flat curtain panel from side to side, and measure the length from the bottom of the curtain to the bottom of the rod pocket. Add 6 inches to the length and 4 inches to the width for hems, and cut the lining fabric to these measurements. Sew sections of fabric together as necessary to create panels of the required width. Fold the bottom hem up 2 inches and press the fold.

Turn an additional 2 inches and press the fold. Turn an additional 1 inch, press and sew close to the second fold. Turn the side hems in 1 inch, press and fold again 1 inch. Lay the lining panel flat, wrong side up, on the table, and pin one side of snap tape to the top edge of the lining. Sew the tape in place with one line of stitching on each side of the snaps, following the manufacturer’s installation instructions. Lay the curtain panel, wrong side up, on the table and position the remaining side of the snap tape along the bottom edge of the rod pocket. Align the first snap with the same location as the corresponding snap on the liner, and sew the tape in place. Snap the liner into place, and hang it on the curtain rod to complete the project. /Getty Images Suggest a CorrectionSince moving to our new home over a month ago, I have had blackout curtains on my “to-do” list. And while waiting for those curtains to be made……I’ve had blankets and tablecloths hanging from the curtain rods.

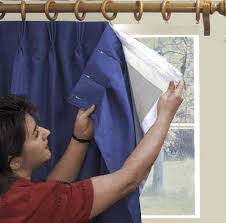
My little guy has had a Valentine Tablecloth (with large hearts all over it) hanging over his window. He keeps asking when his “real” curtains will be ready. Sorry buddy……the time is now. I have finally begun making curtains for the kiddos room……and making them into Blackout Curtains. In a seriously simple way. Nothing fancy……just a piece of Blackout Lining added to my curtains. It stays right in place and unnoticed…………unless you separate the fabric from the lining.The lining is in place on the left and then is pulled out of the way on the right. The lining is added right up at the top of the curtains. And hangs perfectly straight, slightly smaller than the curtain dimensions. And you’d never be able to tell from the front of the curtains. Would you like to make your own Blackout Curtains (a really simplified version)?? First of all, I bought my curtains from Ikea because I loved the fabric of these grommet curtains.

However, I didn’t want the grommets. Lucky for me, the curtains were too long so I just cut the grommet section off at the top. So if you have existing curtains or if you’re making new curtains, you can simply add some blackout lining to the back of your curtains. I went to Joann Fabric and found some blackout lining for $6.99/yard but it was half off. (It comes on a big roll back by their upholstery fabric and you can buy it by the yard.) So I bought like 12 yards of it so I could use it with all of the bedroom curtains. And because I bought so much of it, they wound it right back on the roll that it comes on. (Here’s the kind I bought.) This blackout fabric has 2 sides to it. A fabric side and a smoother vinyl feeling side. The whiter side of mine is the fabric feeling side and I wanted it to face outward and the more beige side (smoother vinyl feeling side) to lay right against my fabric. I think the unspoken rule to is to have your white curtain lining face the window so that passersby outside only see white.

(By the way, you can iron this blackout lining on a low setting……but be sure to iron on the fabric side.) If your curtains are already constructed, just cut your piece of curtain lining slightly smaller along all edges, and then attach your lining near the top of the your curtains. Perhaps right below whatever sort of hem you have at the top. If you’re making your curtains from scratch (or have cut off the top like I have), hem both sides of your curtains first and then hem the bottom. Next, fold over the top a 1/2 inch and then another amount that’s big enough to go around your curtain rod. Iron flat and pin in place. Then cut a piece of blackout lining that is slightly smaller than your curtain panel (about an inch smaller along all edges). Next, slide the top edge of your lining under the folded over section of fabric at the top. I slid mine under about an inch. Be sure that your lining fabric is lined up all the way around and is still laying inside the dimensions of the curtain panel by about an inch.