curtain track for bay window dunelm

Hanging your new curtains really needn't be a chore. You've already chosen the ideal heading, now it's time to hang them. Whether you've taken the easy route of pencil pleat curtains or the even easier route of eyelets, your curtains will be up in a matter of minutes, completely transforming your home. These curtains will be up in a jiffy! Feed each eyelet over the pole; make sure that the leading and outside edge of the curtain points inwards towards the window. Position the final eyelet between the bracket and the finial. There you go, all done, and relax. Pinch pleat curtains are already pleated for you so they will be hanging and looking lovely in a trice. All you really need to do is decide where to position the hook that sits at the back of the pleat. If you have a pole then move the hook to the top of the heading, this will make sure your curtain hangs below the pole. For curtain tracks position the hook towards the middle so that the heading will cover the track.
Make sure that you have the same number of track gliders or pole rings as you have pleats and then simply hook through. If you have a curtain pole attach the final curtain hook between the bracket and the finial and for a curtain track attach it to the fixed glider at the end. All done, sit back and relax. If you've never hung pencil pleat curtains before we've made these instructions really detailed to help you, rest assured its common sense rather than rocket science!
cib curtains sri lankaThe key thing here is to just take your time.
made measure curtains dunfermline Tie the cords before you gather!
rundle curtains and blindsYou will need to tie the cords at one end of the heading tape.
second hand curtains moreton in marsh
If you don't do this when you start to gather the curtain the heading tape will unravel and this is never a good thing! Most people like to tie the curtains off at the leading edge, i.e. the edge that will meet the other curtain in the middle.In the unlikely event that you do accidentally unravel the heading tape then get a tapestry needle to re-thread the cords through the holes.) Before you start to gather grab a tape measure and check the width that the curtain needs to be. It's worth gathering the curtain to a few centimetres wider than you actually need so that there's no need to yank each side of the curtain to get them to meet in the middle once they are hung! Take hold of the loose cords at the un-tied end and start to pull them. Pull the cords evenly so that the pleats will be nice and straight. It can be easier to check the evenness of the pleats by looking at the heading tape rather than the actual pleats in the curtain. Once you're happy with the width of the curtain tie the cords.

Don't cut the cords though as you may at some point want to loosen the curtain for cleaning or maybe to hang at a different window. So that the long cords don't keep peeping out at you wind them up over your hand. Some people attach the cords to the lining with a safety pin to really keep them hidden. At this point take the time to make sure your gathers are nice and even, it takes a little patience but we promise it will be worth it! Count the number of gliders or rings that you have on your track or pole and then divide by half. This is the number of hooks that you need to attach to each curtain. Before you put the hooks into the pockets it's worthwhile placing them loosely on top of the heading tape. An even distance between the hooks makes all the difference and will give your curtain a professional edge! Make sure that you place a hook on the outside edge of curtain so that when the curtain is pulled closed it will stays securely at the end of the track or pole.

It's worth considering the position of the hook on the leading edge too. Place it so that you can achieve a nice 'overlap' with the other curtain when they are closed. The heading tape has three rows of pockets. For curtain tracks you will need to insert the hooks into the low or middle row of pockets so that the heading hides the track. For poles insert the hooks into the top row of pockets so that the curtain hangs below the pole. Just make sure you insert the hooks into the pockets rather than onto the cords! Now just pop the hooks into the pockets on your chosen row. It can be easier to hang curtains with a friend who can hold the weight of the curtains while you attach them. If you've gone to all the trouble of creating perfect pleats you don't want them all to move if the curtain hangs in mid-air for a while! If you have a curtain pole attach the final curtain hook between the bracket and the finial and for a curtain track attach it to the fixed glider at the end.

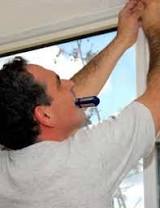
We're sure your curtains now look magnificent and totally professional. Time for a nice cup of whatever you fancy.Curtains are essential for creating privacy conserving heat and blocking out noise. They are also great decorative features. Read our essential DIY guide below to make a good job of fixing curtain rails around your home. There are various types of rails or tracks to choose from, from flat brass rails, traditional I shaped rails, flat profile rails, nylon, aluminium and plastic rails plus various types of curtain poles, including wooden and metal poles. Whichever rail you choose you need to find out if it is long enough and strong enough for your curtains. Also consider the type of window you are fitting your rails to. A bay window will require rails that can be bent around the shape of the bay.The most popular types are the plastic, aluminium and nylon rails which are strong, light and very flexible. These varieties are good because they can be cut easily, are very flexible and can be bent around corners making them ideal for bay windows.

Wooden poles are also very popular. They are very easy to fit with just a bracket at either end and easy to cut. The extra good news is that both the plastic/aluminium rails and the poles are inexpensive to buy.Ensure your choice of curtains rails or poles are long enough. They can easily be cut to size if they are too long. But if they are too small it is not advisable to join pieces together.If you use a batten to support curtain rail brackets ensure you fix it to the wall securely using screws, plugs or a very strong adhesive. For ceiling mounted rails use screws that are long enough to penetrate the plaster and go into the joists. Always use a spirit level to check that curtain rails and fixings are horizontal. You can easily fit cords for drawing your curtains if you wish. Using large curtain hooks is a good tip if you want to make sure the curtain conceals the rail. Remember to consider what your curtains look like from the outside as well as the inside of your property. You may wish to be consistent in your choice of colours and materials, at least for each side of your home.

A good style tip is to think of matching the colour of your curtains with an element of your room but not the overriding colour of your room. E.g. if you have white walls and a blue carpet a blue curtain would work well. If your lintels are concrete then you would have to begin with a small masonry bit and work up to a larger one. For steel, you may have to buy more specialist drill bits which invariably will cost. Another option as specified in the article is to glue or drill a section of timber or batten above or below the lintel and fix to that. You would have to find a specialised extra-strong construction adhesive that would allow it to support a curtain rail. Hi I have a problem above all my windows in our bungalow with putting fittings above to support curtain rails. The area above the window which you need to drill into seems to be made of iron/concrete. I have tried using different drill bits to go through but the fittings still seem to come down have you any suggestions please?
Advice please on fixing curtain rail to ceiling! There's one joist running from left to right exactly above where we wanted to put the curtain rail. Is it ok to put all the brackets into this one joist? [Curtain rail is going to be 375cm (corner to corner of room) and the curtain drop will be 235cm. Curtain rail is ok for weights up to 14kg according to manufacturer.] @Ruby - as suggested in the article can you fix the eye screw into the window frames? If you have double-glazing you might be able to use adhesive-backed hooks. I hope this helps. I need to put up net curtains around my flat but most of the windowsills are on concrete walls. What's the best way to put them up using the net curtain wire with the hook and loop? @Crafty b - there should be a joint placed in the middle of the pole that should help you pull it apart. Have had wooden curtain poles fitted for the first time and threaded curtains through pole. I now want to change this and put rings on but not sure how to take pole apart to get curtain off.

Could you please help ? Always good practice to use a batten as less holes in wall, neater and better stronger fixing. If you fix straight into wall you run risk of creating massive holes in time when fixtures loosen with the constant tugging on curtains etc. Never EVER use glue either. Lazy and more problems in the future...... :O @Wendy - it sounds like it might be faulty. Can you return it to the shop? Instructions are fine when things go OK. I have put up two rails successfully but now find I can get the third rail to lock onto the brackets. It just keeps flicking off Thanks for the instructions.What height should the lathe or batten be and if it measures more than the track, where on the batten should the track be positioned?This has implications for the curtain headings and positioning of ruffle tape. I bought some extendable curtain poles with cracked glass finials. However these fit into pole with a plastic stopper which has a small screw and bolt at the end that goes into pole...however they do not fit snuggly so the finial wont stay in..