curtain grommets joann
While waiting for my cushion zippers to arrive, I started making the camper curtain panels. Two for each bed, two behind the sink, one over the “dining room” window and one over a small window beside the door. The old curtains that went across the beds had some sort of netted fabric at the top. I’m not sure why… maybe so the air could circulate or so you could see out. I couldn’t find the same kind of netted fabric so I decided to use a piece of screen instead. I’ve sewed with screen before when I made my daughter a dog carrier. It’s really easy to sew. I cut a screen piece 13” X the width of the panel. For the top, I cut out a piece of fabric, 5″ X the width of the screen, folded under the top and bottom to form a 2″ header piece . Then I inserted the top of the screen inside 3/8″, stitched it closed and top stitched it 1/4″ from the first stitching. I hemmed the sides of the curtain panel and then stitched the bottom of the screen to the curtain top, and finished it with two rows of top stitching.

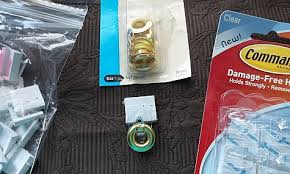
I then trimmed off the excess screen at the sides. I covered the sides of the screen and header with a 3/4” fabric bias strip and added a second row of stitching. I hemmed the curtain and that was it…I was done, except for adding the grommets to the fabric header. I have to say they turned out really nice. I can’t wait to see them hung! For the other panels, I hemmed the sides and bottom, and folded the tops to form a 2” header (for the grommets). Because the fabric is lightweight, I plan to iron on squares of heavy interfacing on the back of the header where each grommet goes. The reason I”m not adding interfacing across the whole header is because I want the fabric to fold when the curtains are pulled open. I found the grommets and tool kit at our local Ace Hardware store. They were a lot cheaper than at Joann’s and contained more pieces per package.My idea for hanging the curtains is going to work out great! As I mentioned in a previous post, the old curtains had the (curtain) bracket clips (white) sewn onto them.

This made it difficult to remove the curtains for cleaning and storing. I came up with the idea to apply small Command brand hooks (clear) to the white clips on the curtain brackets and then add grommets to the top of the curtains that would hang on the hooks (3/8” grommets fit the hooks perfectly). I tested this by making the curtain for the small window. I snapped 4 clips with the Command hooks on them onto the curtain bracket and then slipped the curtain grommets over the hooks…perfect! The curtain easily slid open and closed. I’ll post a picture of how the finished curtains and cushions look once they’re in the camper. Now, back to sewing more curtains and the last of the cushions! Rate this:Share this:Like this: Places I've Been Featured I'm so happy today! I just finished hanging my new Roman Shades in my kitchen! The windows in there had been bare for years and honestly, my neighbors were starting to complain. You see, when you look out of my kitchen windows you see my neighbor's house and driveway.

There's no buffer zone between our homes. My house is literally on the boarder of their property, so there's no privacy, but I grew up in the middle of no where, where trees hid our windows and allowed us to walk around in our underwear anytime we wanted....ah those were the days! Well sometimes I forget that I don't live in the woods anymore and sometimes I might walk through the kitchen past the windows to my laundry room in nothing but a towel...hence my neighbors complaints...oops!
kohl's pinch pleat curtains Time to cover them up!
72 x 84 shower curtain hooklessTo remedy this, I bought fabric a few weeks back to make window treatments and only now have gotten around to making them.
net curtains cwmbran
I don't know about you, but when I make a fabric purchase like that (anything over 3 yards) I get "project cold feet." I think its especially bad when I have to sew. I like sewing, but I hate sewing machines. Each and every one has the devil in them and they will without fail cause a lot of problems. Finally, I got up the courage to begin the project. I always like to do a little research before I begin a project, so before digging in, I looked up a variety of ways to make Roman Shades.
beckett green striped curtainsThrough the website Apartment therapy I found a great little tutorial on the home decorating and DIY Blog The Little Green Notebook. In this tutorial, the Blogger used mini blinds as the bones of the shade. In this post I'm going to show you how I did it, because I did tweak it a bit to make it easier for me. First I started with cheap mini blinds from Walmart. Go to your window and measure the height and width.

Decide how long and how wide you want you treatment to be. I wanted mine to fit inside the window moulding. The window measured 53 inches long, so I made the shade extend 54 inches long. For the width I measured 23 inches wide and wanted the shade to extend to 25 inches. With the measurements taken, begin preparing the mini blind. Extend the blind to their full length on a flat surface (I chose my dirty floor!) Mini blinds have a series of cords that hold the plastic strips in place and help lift the shade. The lift cord is thick and the ladder shaped cord holds the plastic strips. Cut the ladder cord out of the blind, but be very careful not to cut the lift cord! With the ladder cord removed, the plastic strips will slide freely up and down the lift cord. With the measurements you took of the window, decide how wide you want your pleats to be in Roman Shade. Since I measured 54 inches long, and I know that 6 is a multiple of 54, I decided my pleats would be 6 inches long.

There's no formula here, just try to give yourself easy numbers that can be easily divided in whole numbers. Also, a 6-9 inch pleat look best with a small window, so keep that in mind when measuring, Okay, so I know that my shade is 54 inches long and that every 6 inches will be a pleat. The pleats are made by gluing the fabric to a plastic strip. A pleat every six inches means I need 8 plastic strips and the bottom Slat to glue onto for a total of 9 plastic strips and slat. See that: 9 x 6 = 54. First I need to remove the thick bottom slat to take out the plastic strips I don't need. Do this by prying off the two plugs on the thick slat. You'll see inside the end knot of the lift cord. You can untie or cut this knot off. Then slide the thick slat and all of the plastic strips you don't need off. Measure the lift string to the desired length (mine was 54 inches.) Reattach the thick slat and tie off at the measured mark. Cut excess string and push the tail into the hole.

Replug the holes with the plastic caps. For my shade I have 8 plastic strips and a thick slat. The whole thing measures 54 inches long. Now I want to place the altered mini blind on top of the fabric I'm going to use. I was lucky in that my fabric from top to bottom was the same length as my altered shade, so I didn't have to cut and hem the top and bottom. The sides were rough and did need a hem, so I measured and cut the fabric so that from side to side the fabric went past the plastic strip about 2 1/2 inches on each side. To make the no sew hem I used heat and bond. Heat n' bond is just paper with an adhesive back, that when ironed onto fabric transfers the glue to your surface. Just remove the paper and you have a clean flat strip of adhesive that when ironed again makes a nice little hem. With heat n' bond on the edges of the fabric, I found the middle of the fabric panel. I folded the panel in half and ironed a crease so that I could use my quilting ruler to make a nice uniform hem.

Fold over and press. Also if you had put a crease in the middle of the panel, now is a good time to press that out. The finished product should look like this, however depending on what your fabric is like you may have to do the same to the top and bottom. Now place your mini blinds on top of the back side of your fabric. Find the center and with fabric glue, attach the thick mechanical top to the top of the fabric. note: the pull should be flush with the fabric. Then carefully measure from the top mechanical slat to the desired length of the next plastic slat. Mine was 6 inches, so I measured 6 inches down and marked with pen. When all my marks were made down both sides of the shade, I put glue on the round side of the plastic strip and adhered them to the fabric. While I was gluing, I made sure that I had the plastic strips on dead center, lining from top to bottom with the top slat. I used my ruler to measure in 1 1/4 inch (this is half of 2 1/2 inches) I glue and measure, glue and measure all the way down to the bottom slat.

BE SURE NOT TO GLUE THE LIFT CORD TO THE FABRIC! The lift cord must be free of glue so the shade can go up and down. I then allowed the shade to dry completely over night. I used a beer bottle, yes a beer bottle to hold the bottom slat in place to dry correctly over night. The next day, I hot glued the excess fabric on the top and bottom, folding them over the thick slats. Leave the side of the top open and free of fabric so it can slide into the bracket at installation. With the brackets in place in window, the top of your shade should slide right in place. When finished the shade is installed it will be able to lift up and down. Guess who's going to be able to run to the laundry room in her underwear now? A lot of you have asked what color of paint I used on my walls in the kitchen. Because I am cheap I can't give you a clear cut answer. I went to Walmart and found an expensive paint color I liked and then ask them to clone it with their store brand Color Place.